How to Docker
A guide written by Jonny Langefeld
What is Docker?
Docker is a software container platform.
- Developers use Docker to eliminate “works on my machine” problems when collaborating on code with co-workers.
- Operators use Docker to run and manage apps side-by-side in isolated containers to get better compute density.
- Enterprises use Docker to build agile software delivery pipelines to ship new features faster, more securely and with confidence for both Linux and Windows Server apps
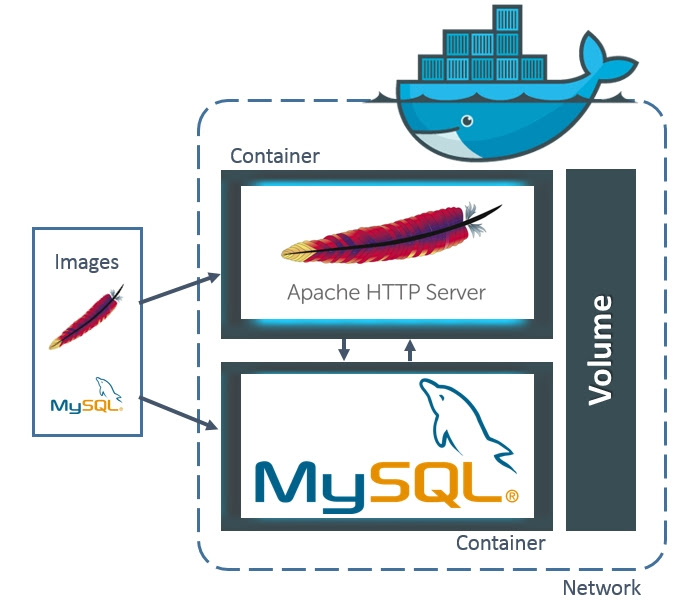
Docker Terminology
Images
A docker images is the "cooking recipe" for a container. It contains all the definitions how to boot up the linux environment. Typically one Docker image is there to fulfill specifically one task. For instance one image would define your webserver and another image would define the underlying database.
Containers
Containers are the instantiations of images. They are one form of the image. Compare it to object oriented programming, then your class would be an image and instance of the class a container. Another comparison would be to real containers on ship. They have a unidbody from the outside, but can look very different from the inside. Some interesting facts about containers:
- containers are not persistent. As soon as you don't use them anymore they get stoped (or even deleted)
- a container only lives for the time a process runs inside it which does not get killed (of course you could run processess which never send an exit command)
- containers can include data however it's also not persistent. If you want to make it persistent, you can use volumes.
- to communicate between containers, use the same protocolls as you would use to communicate between computers (e.g. tcp/ip)
Volumes
Volumes can be used as underlying data layer. They can be used between as many containers as you want. All data stored in here could be used by all containers connected to it.
Networks
Docker comes with its own networking capabilities. The name of a container is its hostname. The easiest way to try this is to have two containers running and ping one container from inside the other container. Docker Compose will raise its own subnet.
Let's start with some actual containers. But first let's check if your docker deamon is running. Copy and paste this to your command line:
docker --version
Containers
If you get the docker version as an output, you are good to go. If not, first install docker correctly.
docker run hello-world
The following output should pop up on the screen:
Hello from Docker!
This message shows that your installation appears to be working correctly.

To generate this message, Docker took the following steps:
 1. The Docker client contacted the Docker daemon.
 2. The Docker daemon pulled the "hello-world" image from the Docker Hub.
 3. The Docker daemon created a new container from that image which runs the
    executable that produces the output you are currently reading.
 4. The Docker daemon streamed that output to the Docker client, which sent it
    to your terminal.

To try something more ambitious, you can run an Ubuntu container with:
 $ docker run -it ubuntu bash

Share images, automate workflows, and more with a free Docker ID:
 https://cloud.docker.com/

For more examples and ideas, visit:
 https://docs.docker.com/engine/userguide/
The output already describes really good what has happened with this one command. So you started a container, the image of which came from the official docker hub, it executed just an echo command and exited again.
Now send the command:
docker ps -a
And the output should be something similar to
CONTAINER ID    IMAGE          COMMAND    CREATED         STATUS                     PORTS    NAMES
8d0249bb31fe    hello-world    "/hello"   3 minutes ago   Exited (0) 7 seconds ago            lucid_goldwasser
this is the container you just fired up, but which of course exited right away. In the names column you see a radnom name. Even if the container id is also a unique identifier, it's sometimes easier to have a real name. So this is only for your convenience, but does the same. Let's give our hello world example a name:
docker run --name my-hello hello-world
Sure enough it does the exact same thing as in our example above, but this time, if you fire docker ps -a you have two rows, one of which has your new name.
If you would just re-run the command above, you would run into an error as there is already a container with the name my-hello. To get around this you would need to send:
docker rm my-hello
To get around this in the future, you could just run your container with the --rm flag. It means that your container gets immediately removed if it exits.
Now as the hello-world container suggests, let's get into a more elaborated example:
docker run -it --name my-linux-container ubuntu bash
Good Job! You just started a full docker container, that runs an ubuntu linux. The bash at the end of the command indicates, that you got directly sent into the bash of that linux, indicated by the '#'. You may have noticed that it took a while to start the container. That is because docker did not find the ubuntu image locally, so it had to download it from the official docker hub.
Any command you issue from here only lives inside this container. Let's say you create a file with touch myfile, it only lives as long as you type the word exit.
The -it flag is needed to create an interactive tty.
If you now send docker ps -a from another window, you see your running container with the name my-linux-container
Now type
exit
to exit the container. The docker ps -a command will show to exited container.
Now fire the command
docker images
It displays the two images we used so far. They are now downloaded on your computer. You can delete them at any time to free up disk space with the command docker rmi [image name] (if your image that you want to delete is still in use by a container, but you are sure that you want to delete the image anyway, just use the -f flag.
What's interesting now, is if you start the ubuntu container again with a new name:
docker run -it --name my-linux-container-1 ubuntu bash
See how quick that was? That is because the image now got downloaded to on your hard drive.
After a while playing with docker you are going to have a lot of exited containers (remember you can list them with docker ps -a. To get rid of them just execute the following:
docker rm $(docker ps -a -f status=exited -q)
In general there will be a whole lot you might want to delete after using it. This Digital Ocean site does a pretty good job of explaining that.
Volumes
Let's create a container that actually refers to some local files. This can be done with the -v flag. You can always refer to run --help to get all the details for the syntax. The notation would be
-v [path to local]:[path inside container]
The following example is for Windows (where the C:\Users folder is shared with the virtual machine by default). On Mac and linux you would just use a regular path like /user/admin/docker
docker run -it --name my-linux-container --rm -v /c/Users/:/my-data ubuntu bash
Then you can execute
ls my-data/
to see the linked files. But be careful! Your container now refers to actual files on your hard drive. So if you remove something inside the container it will be gone on your host system as well (and linux would not ask for confirmation). So it's better to only link the sub folder that you intend to use.
Dockerfiles
This is where things get interesting. The dockerfile is your actual "recipe" which defines your images. So far we've used images created by others. As the hello-world container told us, it was looking locally for the hello-world images, did not find it, so it searched online. By online it means the official Docker Hub.
A Dockerfile is literally just a file called 'Dockerfile' on your system. Let's create one.
You pretty much always start a Dockerfile based on another container. So your Dockerfile most likely begins with the FROM keyword. After that you can execute any linux command you like with the CMD keyword. (Find here the list of possible keywords - but don't let them intimmidate you. There are a lot!).
Now create a new Folder on your system and inside this folder create a new file called Dockerfile (no .txt or anything) and just paste the following lines in it:
FROM ubuntu
CMD echo "Hello Jonny" #Yes you can use hashtags as comments here! Just use your name here.
Now after saving this file, we need to create an image out of this. Go back to your terminal, change the directory into your newly created folder and execute the following (don't forget the dot at the end):
docker build -t my-ubuntu-image .
What this command does is creating a new image with the tag my-ubunut-image. The dot at the end just tells the command that it should look in the current directory for the Dockerfile.
Now execute
docker images
To see your newly created image in that list. Now of course we want to run it:
docker run my-ubuntu-image
Did you see the output on the screen? That is because we had that in the CMD command. This command actually overwrote the /bin/bash command that is being executed by default.
Now let's do something more advanced. Let's say we want to create an ubunut container, with python already installed. For that, change your Dockerfile to the following:
FROM ubuntu
RUN apt-get upgrade && apt-get update && apt-get install -y python3
This time we don't have the CMD keyword, which means it just uses the cmd command from the original ubuntu image (which is /bin/bash). However this time we have the RUN keyword, which executes any linux command during the build of the container. Here's a little comparison of the two:
- The
CMDkeyword is for what will run as soon as you start up the container (could be any .sh script of course to make it more elaborated) - The
RUNkeyword is if you want to install anything inside your container
We could have done a single line for each of the three commands like
RUN apt-get upgrade
RUN apt-get update
RUN apt-get install -y python3
However Docker will create a cashed container for each of the rows in a Dockerfile. This is very helpful if you need to re-run your container, cause extensivly running scripts don't need to be re-evaluated. To not create unnecessary cashes, you want to put as many commands as possible in one row.
If you now save the Dockerfile with the contents above and re-run the build command docker build -t my-ubuntu-image ., and then run the container with the following command:
docker run -it my-ubuntu-image
As soon as you see the #, just type python3 and you will be inside your just installed python instance.
However it's very likely, that you only have to customize existing containers. For data science and machine learning for instance I can recommend the official continuum analytics anaconda container
Docker Compose
The last thing of interest for a beginner might be docker compose. Docker containers are meant to only contain one service (micro service management). But what if your applications needs multiple services like the example above? Then docker compose is your tool to fire up as many images as you need. Here is a fairly easy example, that will just fire up two containers with web apps. They both run on port 80 inside the container, so I exported them to the ports 81 and 82 on the host system. That means inside the container you would receive the html with localhost:80, but from the host system it would be localhost:81 and localhost:82
The images I am refering to can be any image from the public docker hub or from your own built images.
Now just create a file called docker-compose.yml and paste the following:
# Docker Version: 1.13.0
# Docker Compose Version: 1.10.1

version: "3"

services:
    web1:
        image: dockercloud/hello-world
        container_name: web1
        ports:
            - "81:80"

    web2:
        image: dockercloud/hello-world
        container_name: web2
        ports:
            - "82:80"
Run all container at once with
docker-compose up
And check the adresses localhost:81 and localhost:82 on your host machine (or your VM ip adress on windows respectively. By default 192.168.99.100). From another terminal window you can execute docker ps -a to see your two running containers. It should also show you the exposed ports.